
Guitar Advice and How-to's
Setting up your guitar to make it play its best
What makes a guitar into a stage guitar...
The difference between playing recreationally and playing professionally, is that if you are performing in a concert setting, it is very important that your guitar stays in tune and that you don’t break any strings during the performance. Different guitars, with different hardware require different preparation for onstage use. Each bridge type will have different needs to be sure that your tuning is stable, and that you are not left with fewer than six strings at a crucial moment. Imagine playing Wembly Stadium, it’s your extended solo and you break your G, and there’s nothing you can do about it. How this can be avoided is not so much luck as it is preparation, and that is what I am going to discuss here…
Stage prepping your guitar
Strings typically break in three distinctive areas; 1.the bridge, 2. the nut, and 3.where it is struck by the pick. In nearly all cases, no matter how energetically you play, the cause of string breakage is abrasion, not impact. It is actually very hard to impact a string so hard that you end up breaking it. So lets look a bit deeper at the specific causes, and we’ll begin with #3 first because it is the easiest to fix…
Do you have a favorite pick? I don’t mean your favorite type of pick, I’m talking about that lucky pick that you have used exclusively for like 27 years because the girl you threw it to in the audience brought it back to you after the show and now you have three kids together. OK, so it’s time to get a new pick. G strings in my experience are the ones to break mid string more than any other, likely due to the arc of the fret-board, such as they are the top of the higher (lower) strings, and therefore subject to the most impact in normal playing. Once a pick begins to wear, you are slightly abrading the strings as you play chords, especially, and over time that wears through the windings, which are actually quite fragile as compared to the core of the string. In the late ’70s, I used stone picks which did not wear and did not generally damage the strings. They did however do a number on the face of the guitar… Most picks today are usually either a hard or soft plastic. Some such as Dava Control have an insert that may also be plastic or stainless. With the stainless ones especially, you really need to carefully examine the condition of the tip before going onstage, because if they become rough in any way, they will eat your strings in short order. I personally like those picks a lot, but even with the plastic ones, you need to check them for damage, and replace picks showing wear. I currently use Jazz III’s which are typically soft plastic. Some are harder than others. The soft ones are less likely to damage the strings when worn, but will lose tone, and be harder to hold, if they are so worn as to make it hard to find the tip. Harder picks, like Fenders for example can break. That can happen in an instant and you need to replace a broken pick immediately. I used to buy Fender thin teardrop picks by the gross when I was starting out.
Prepping your nut and bridge
Depending on your guitar and its configuration, there are a number of things that you can do to turn it from a string eater to a bulletproof stage monster…
Example #1 - Stratocaster with standard or Mexican tremolo bridge
This Stratocaster was built by me, using a Mexican Strat as a donor.
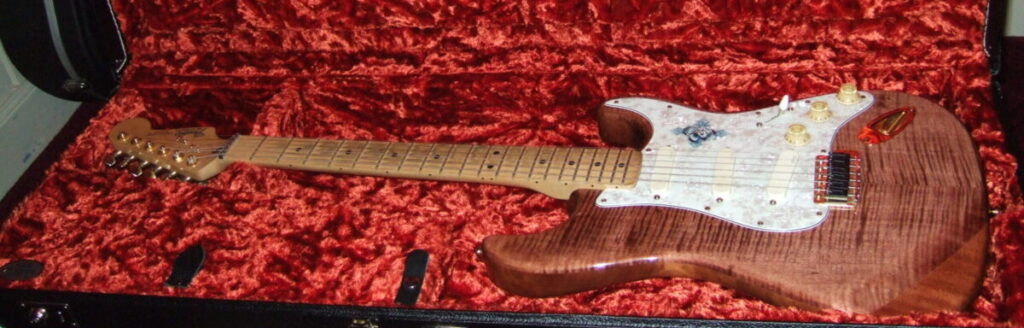
The body was copied from the original Fender body, but made from two distinct types of mahogany, with a flamed maple top. I did the gold plating in house. But of particular interest in this article are the modifications that I made to the neck, and bridge. First the neck. I began by stripping the finish off of the fingerboard and replacing it with oil finish. It does require periodic maintenance, as you can clearly see here, but it makes for a faster neck. The MIM Strat came with the stamped tree strings back in 1992 when this guitar started out, and while they correct the string geometry at the nut, they do not allow the strings to slide under them as easily as the cast ones, which is what I replaced them with. Next was the tuners. If you are playing on stage, and would like to make it through the set in tune, you want locking tuners. There are additional advantages to these tuners, besides keeping in tune. If you are replacing a lower cost tuner like the ones that Fender used to install back in the day, you will also enjoy a tighter piece of machinery, which translates the vibrations of the strings to the head stock better and therefore improves the sustain and hence tone. I selected Sperzel tuners for this as well as my acoustic guitar, the difference to each was noticeable. The biggest advantages of locking tuners is that unlike with traditional tuners, there is typically less than one turn of string on the barrel of the tuner, which means that the windings do not tend to tighten on the tuners as you play, as that would result in the strings going flat. In order to fully realize this benefit, a Fender LSR roller nut was installed. This nut allows the strings to freely move as you use the tremolo, do bends, etc, as opposed to locking the strings into position. This means that the tension is always from the tuner to the tail block and not trapped in a locking nut. So the string can move naturally, and does not become mis-tensioned between the nut and the tuner, like with a Floyd Rose setup. Finally, the bridge saddles have been replaced with the Graphtech String-Saver saddles, which are made with graphite. This guitar is at least 12 years old, in this configuration, and I have as yet to break a string. All of these parts in combination work together to help prevent string breakage and keep the instrument in tune. It is, on this guitar, the ability of the strings to move freely along each vibratory range (bridge to nut, nut to tuners) which makes it just plain reliable.
Example #2 Ibanez Jem 7V with Floyd Rose type "Knife Edge" Tremolo
The main modification to this guitar is a Roland MIDI pickup. This is my “daily driver”.
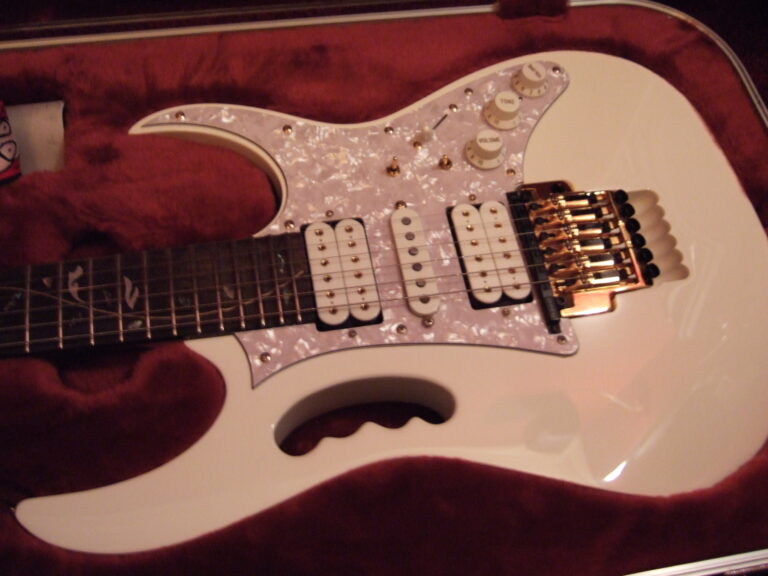
The main thing that you can do on these to avoid string breakage is to replace strings on a regular basis, depending upon how much you play them. If you do get strings breaking, you have likely worn a burr into either the locking nut or the offending bridge saddle. You should keep a jeweler’s rat-tail file handy to lightly dress any burrs that may develop. I have had this since 2007 and never had such a problem, but, that is the fix. As to staying in tune, it is absolutely necessary to properly set up these guitars before you can play them. This means getting the deck of the tremolo bridge to come to rest precisely parallel to the body. If it is at an angle, at all, when the strings are apparently in tune, you will have nothing but problems. So when you get one of these, the first thing you want to do is to decide what set of strings you’ll be using and stick with them. You then need to balance the bridge. So you get in tune, and then adjust the springs in the back of the guitar to get the tremolo parallel. After a few times of doing this, and tuning each time, you’ll get an idea of how much before or after the tremolo is straight to tune. Patience is required here, it took me around 4 hours. I’ve only ever had to do this the one time, and I have had all the strings off for cleaning, but I cannot advise you to leave it with the strings off for any length of time, the 15 minutes it’ll take for cleaning should be fine. Keep going until you get it perfect. Most people who have problems with these have never set them up correctly. If these are set up right, and the strings are installed correctly, and the hardware is relatively clean, as often as not, all you need do is pull up on the tremolo and the guitar will be in tune, assuming it was in the first place.
Guitars with Tune-O-Matic bridges, and all bridges with metal saddles.
A guitar is kind of like a car, in that if you fail to maintain it properly, it will eventually start giving you serious problems. Changing strings is like changing your oil. Fail to do this regularly and you will notice that the instrument does not feel or sound like it should, and tuning stability will suffer. One of the most overlooked maintenance items on most guitars is checking for and correcting burrs which can form on the bridge saddles. I believe this to be the #1 cause of broken strings. There are two points on which the strings constantly rest, and through the action of playing, the strings move back and forth in these points. They are the nut and the bridge saddles. Nearly all of the picking/strumming happens close to the bridge, certainly at that end of the instruments. While there are a lot of nuts made of metal, e.g. brass nuts, roller nuts, tremolo lockers. We usually don’t pick at that end of the neck, and due to the design of most of these, if they were properly installed initially, you don’t see a lot of breakage there. The forces are much greater at the bridge, and over time, the slight movement of the strings brought about by tuning, heavy picking, and even normal playing wears on the strings ans the saddles and will eventually cause burrs to form at the leading edge of the bridge saddle. This ultimately leads to string breakage, as the sharp burrs cut through the string as it moves through the saddle. While playing, it does not move very far, maybe a few thousandths of an inch. But if the saddle groove is rough, the abrasive action, concentrated on that tiny spot will soon make quick work of your string(s).
There are two ways to deal with this. On the many instruments where available, I am a huge believer in replacing the stock saddles with the Graphtech String-saver saddles. They are a basically permanent fix for this issue. They are naturally slipperier than their metal counterparts, and in my experience with them, they don’t get burrs like your stock saddles.
The other option is to keep a jeweler’s rat-tail file handy, and when ever you change strings, or if one breaks at the bridge, as you are replacing it, feel for any burrs and if found, lightly relieve the burr using the tip of the file. Remove only a minimal amount of material to restore smoothness to the notch of the saddle.
Additional regular maintenance items to check before going onstage....
Many guitars today have active pickups, or other on-board electronics which require batteries. These batteries obviously don’t last forever, or all that long for that matter, and should be checked before each performance. Battery testers simply plug into your output jack and give you a reading. Anything under 9v and you want to replace the battery. Also, be sure to check that your strap pins are securely tightened to the body. If you have strap locks, this is particularly important, as the sockets on the straps typically “grab” the pins and turn them out as you play. You can try applying a bit of wax in this area, but I’d still check frequently. It’s also not a bad idea to look at your pickup height from time to time, to be sure things have not moved. You don’t have to do this every night, but whenever you are doing a string change and cleaning, it couldn’t hurt.
A little bit of maintenance can go a long way to keeping thing running smoothly onstage.